This is not a detailed blog as such but just a pinout diagram to help diagnosing no spark condition on Peugeot V-Clic mopeds.
Our other ignition fault finding blogs go into more detail as a step by step fault finding process, so rather than rehashing the basics again we will just cover the pinouts here. If you are unsure how to use the information given be sure to read through those blogs first!
The Peugeot V-Clic engine is essentially a Chinese GY6 based 50cc 4-stroke engine as fitted to virtually all Chinese 50cc scooters.
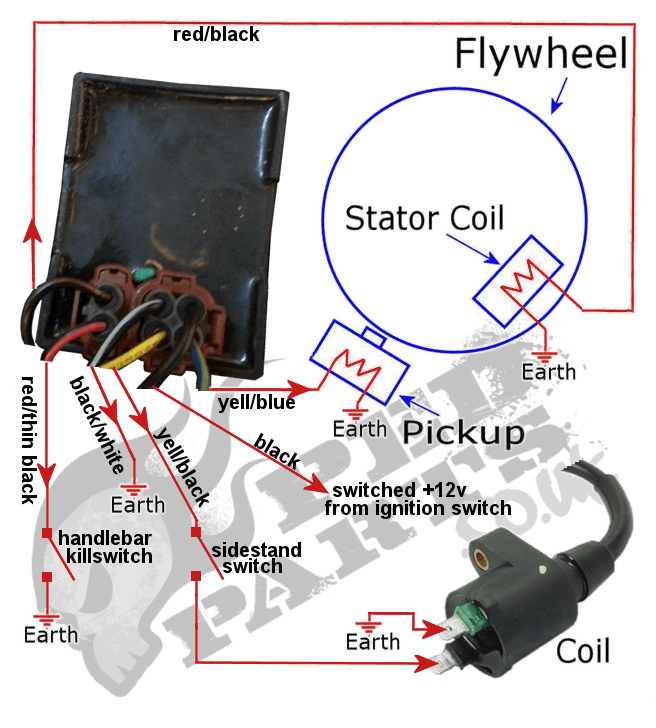
The CDI however is unusual in that it requires both a +12v DC supply and a 60v generated AC supply to operate.
click to enlarge...
Fault finding notes...
In order for the V-Clic CDI to spark the following criteria must be met...
- There must be at least 60v AC between the red/black stator wire (measured at the CDI) and ground with the engine cranking and the V-Clic CDI connected. As a rough guide there should be between 250 ohms and 750 ohms between these two wires (CDI unplugged). The voltage test is the definitive test but a reading of 0 ohms (short circuit) or inifinite resistance (open circuit) can help confirm an inadequate voltage reading.
- There must be +12v present at the black CDI wire. This 12 volt supply is switched on and off directly from the ignition switch.
- Black/white wire at CDI must be connected to earth.
- There should be approx 90 to 140 ohms between the blue/white wire and ground with the CDI unplugged. This is the resistance across the coil inside the pickup which sits on the outside of the flywheel. Although not an absolute test, in practice if you have a reading within this range the pickup is very unlikely to be faulty. Check however the air gap between the pickup and the nobble on the flywheel. Should be around 1mm, adjust if necessary.
- The red wire with the thin black trace stripe goes directly to the killswitch on the right side of the handlebars. This wire is simply shorted to earth when the switch is operated. Test this carefully with a multimeter on a very high resistance reading, sometimes these killswitches can get wet or damaged and still have a small amount of resistance when they should be open circuit. A resistance of a mere 5-10 megohms is enough to cause intermittent spark problems and is easily missed for example if you are testing with a multimeter on 'buzz' setting. Disconnect the switch completely for testing purposes if you are unsure.
- The same applies to the side-stand switch. The yellow/ black coil wire passes directly through the side-stand switch which is unusual for these scooters. Many people simply bypass the sidestand switch to pre-empt any potential problems. This can be done by joining together the two yellow black wires which pass through the switch. You can't really test the yellow/black output from the CDI other than to connect it to a coil known to be working. The yellow/black wire to the coil is actually fairly high voltage, in excess of 100v but because it is a very short duration pulse it isn't picked up by a normal multimeter measuring AC (although it can be seen with a scope)
- Make sure that the engine block is earthed as the pickup etc. earths directly through the engine block.